In this guide you'll be introduced to the Mailbox Manager.
The Mailbox Manager basically contains your settings for your Email account. It also allows you to change those settings.
Logging-in to your Mailbox Manager account
The Heading
Accessing your Web Mail Account and Changing your Password
Email Client Configuration
Inbox Housekeeping
Keyword Filters
Auto Responder
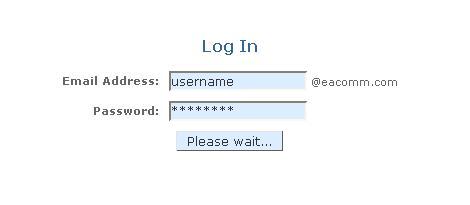
Logging-in to your Mailbox Manager account
Input the address http://mailboxes.eacomm.com/ in your address bar of your browser.
This should take you to a page that look like this.
This page asks for your Email Address and Password to be able to log successfully.
For now try filling up the Email Address and Password with "crisjr" and hit Log In.
[Back to Top]
The Heading
Now let's take a look at the functions of the mailbox manager from top to bottom.
Let's start with the heading.
The heading consists of your name, your email address, your used space to free space ratio, and option to log-out.
Here's what this section looks like.

[Back to Top]
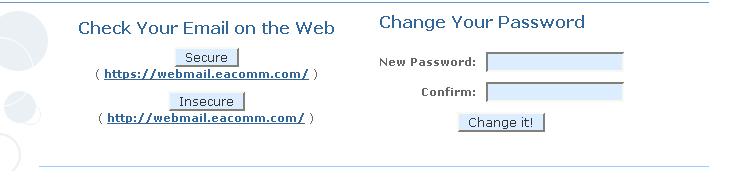
Accessing your Web Mail Account and Changing your Password
This section contains three functions which allows you to:
1.) Check your Email on the Web using http protocol (Insecure)
2.) Check your Email on the Web using https protocol (Secure, the difference with http is that this protocol encrypts data)
3.) Change your password. The first textfield must be filled with your preferred new password so as the second textfield.
[Back to Top]
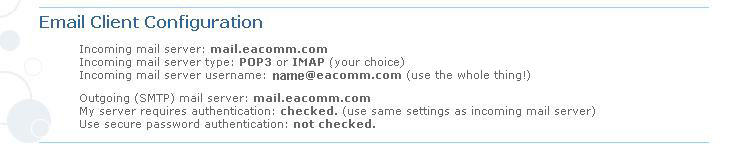
Email Client Configuration
In this section your Email Client Settings are defined.
[Back to Top]
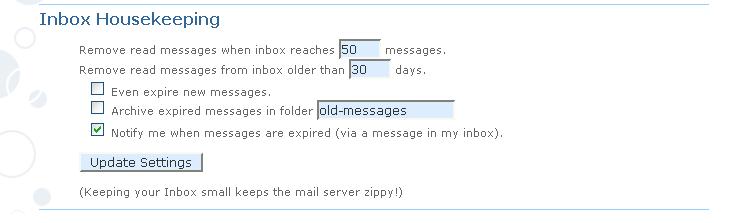
Inbox Housekeeping
In this section you'll be able to specify the number of messages your inbox can contain before it deletes your read messages.
Also you'll be able to specify the number of days the read messages are kept in your inbox.
There are also three checkboxes that allows you to:
1.) Use the options above to apply it to your new or unread messages (Even expire new messages.)
2.) Specify the folder where your expired messages should be saved.
3.) Be notified when a message expires.
After you made changes, don't forget to click "Update Settings" and
a notification message will display in green text stating that your Housekeeping settings have been updated.
[Back to Top]
Keyword Filters
Filters allow you to make automatized actions to your newly received/sent email messages.
When creating a filter you should specify what "part of the email" the filter should be applicable e.g. Subject, From, To, CC, Body. and the "keyword" for the filter.
For example you choose the "Subject" part of the email and the keyword "Sir";
In this instance, when you receive an email message that has a "Subject" that contains "Sir"
e.g. "Sir this is", "Good Morning Sire"; that message is qualified for the filter you created.
Now after the email message is qualified for a filter you can choose three actions for it. You can either:
1.) Move it to your specified folder.
2.) Forward it to an email address you specified. OR
3.) Delete it.

[Back to Top]
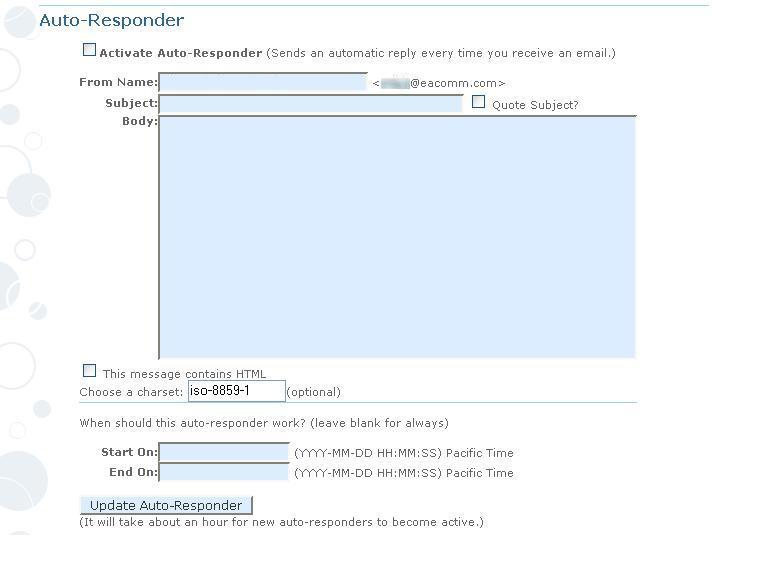
Auto Responder
This section allows you to configure your Auto Responder.
The Auto Responder basically "sends an automatic reply every time you receive an email."
Checking the "Activate Auto Responder" obviously activates auto responder and unchecking it disables this feature.
If you have Auto Responder turned on, you can specify your:
1.) From Name - The field appears before the subject and this is basically the identification of the sender.
2.) Subject - This appears after your From Name and it is the title of your reply.
3.) Body - Contains the message of your reply
Check the checkbox with the label "This message contains HTML" if you used HTML tags in the body of your message.
There's a subsection where you could specify the Start Date and End Date of your AutoResponder.
This should be quite easy, Just follow the format of the date and remember that all inputs should be in numbers.
Don't forget to click "Update Auto-Responder" as soon as you're finished with your settings.
[Back to Top]
Copyright © EACOMM Corporation